
The heat radiating from the forge is not just a temperature; it is a physical weight that presses against your skin. When you are standing at the anvil, you are not just a hobbyist. You are a conductor of molecules. We are taking a rigid, cold bar of mild steel and convincing it to behave like warm taffy. This process of Forging a Simple Fire Shovel requires more than just muscle. It demands an understanding of how carbon atoms slide past one another when the lattice structure reaches a critical state. You can feel the vibration of the hammer travel through the tongs, telling you exactly how much tensile strength remains in the metal as it cools. If you hit it too cold, the grain structure shatters. If you hit it just right, the steel flows into a shape that will outlast your fireplace. We are turning a flat, industrial scrap into a functional piece of art that balances ergonomic weight with rugged utility. Grab your safety glasses; we are about to make some sparks fly.
THE STUDIO KIT
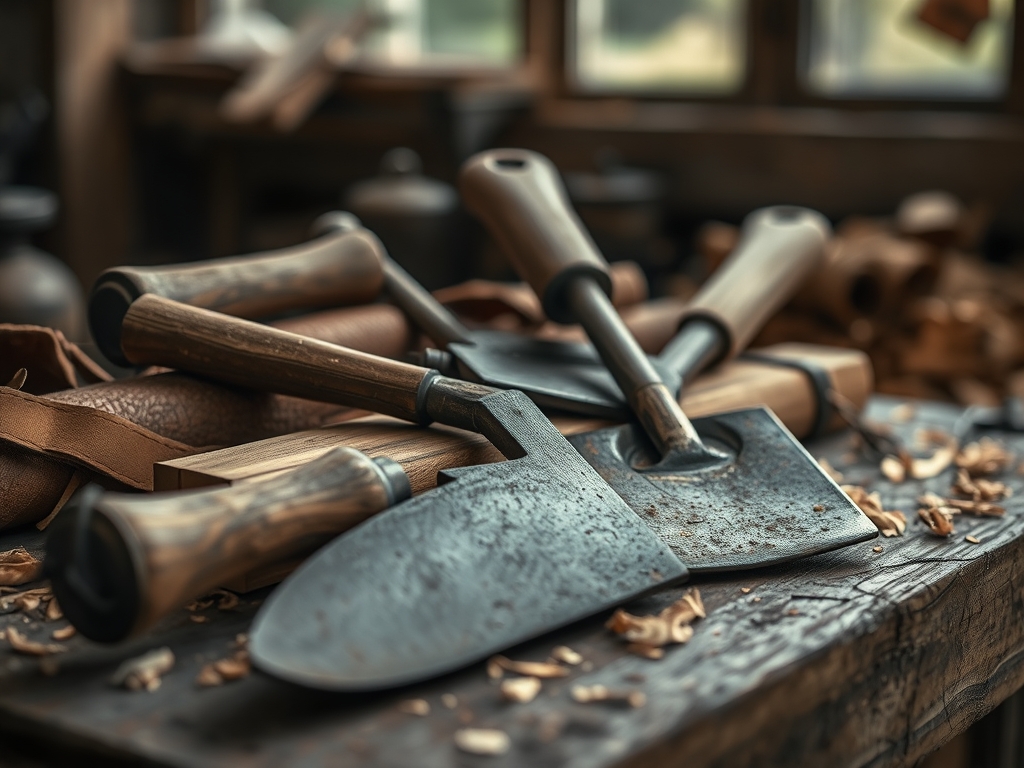
To master this build, your workbench needs more than just a hammer. You are looking for a low-carbon mild steel flat bar, typically 1/8 inch thick by 4 inches wide. This specific gauge offers the perfect balance between durability and ease of manipulation. You will also need a round bar for the handle, roughly 3/8 inch in diameter. For your precision measurements, keep a pair of calipers and a steel scribe nearby to mark your cut lines before the metal gets glowing.
Your primary tool is the cross-peen hammer. The wedge-shaped end allows you to spread the metal in a specific direction, which is essential for widening the shovel blade. You will also need a hardy tool or a hot chisel to trim the edges. For the finishing touches, a wire brush is vital to remove the iron oxide scale that forms during the heating process. If you cannot find new steel, Material Substitutions include old leaf springs from a vehicle, though these require more careful heat treatment due to their higher carbon content. For a lighter version, you could use heavy-gauge copper, but remember that copper work-hardens and requires frequent annealing to prevent cracking.
THE TEMPO
Forging is a dance with time. The "Maker's Rhythm" is dictated by the color of the steel. You have approximately 45 to 60 seconds of optimal forging time once the metal leaves the fire at a bright orange hue. The initial rough-out phase, where you draw out the handle and flatten the blade, will take about 40 minutes of consistent cycling between the forge and the anvil.
The shaping phase, where you fold the sides of the shovel to create the pan, is more delicate and requires about 30 minutes of focused, lower-heat work. Finally, the finishing phase, which includes cleaning the surface and applying a protective wax, takes 20 minutes. Total studio time is roughly two hours. Do not rush the cooling process; letting the metal air-cool slowly prevents internal stresses from creating micro-fractures in the grain.
THE CORE METHOD
1. Drawing Out the Handle
Start by heating the end of your round bar until it reaches a yellow-orange glow. Using the face of the anvil and your hammer, strike the end of the bar to taper it. This increases the length while decreasing the diameter, a process known as drawing out. You want to create a point that can eventually be scrolled into a decorative loop.
Mastery Tip: This step relies on displacement. Because steel is non-porous and incompressible, the volume remains constant. When you hit the top, the atoms must move outward or forward. Controlling this flow prevents the metal from "mushrooming" and maintains structural integrity.
2. Flattening the Shovel Blank
Take your flat bar and heat a three-inch section at the end. Use the cross-peen end of your hammer to strike the center of the bar, moving outward toward the edges. This "fanning" motion spreads the metal wide without making it excessively long. Use your calipers to ensure the thickness remains uniform across the blade.
Mastery Tip: Watch the thermal gradient. The edges of the steel cool faster than the center. If you strike the edges when they are too dark, you risk "cold shuts," which are small folds in the metal that act as failure points under stress.
3. Creating the Shoulder Transitions
To join the handle to the blade, you must create a "shoulder." This is a crisp transition where the round handle meets the flat shovel head. Use the edge of the anvil as a mandrel to create a sharp 90-degree offset. This ensures the shovel sits flat on the hearth while your hand stays at a comfortable angle.
Mastery Tip: This is about stress distribution. A sharp, un-radiused corner is a "stress riser" where the shovel might eventually snap. Always leave a tiny, microscopic curve in the shoulder to allow energy to dissipate through the joint.
4. Folding the Pan Edges
Heat the sides of the flattened blade and use a swage block or the edge of the anvil to bend the sides upward at a 45-degree angle. This creates the "bucket" of the shovel. Use light, rapid taps rather than heavy blows to avoid thinning the metal at the bend line.
Mastery Tip: This step utilizes geometric stiffening. A flat sheet of steel is flexible, but by adding vertical flanges, you significantly increase the moment of inertia, making the shovel rigid enough to carry heavy coals without bending.
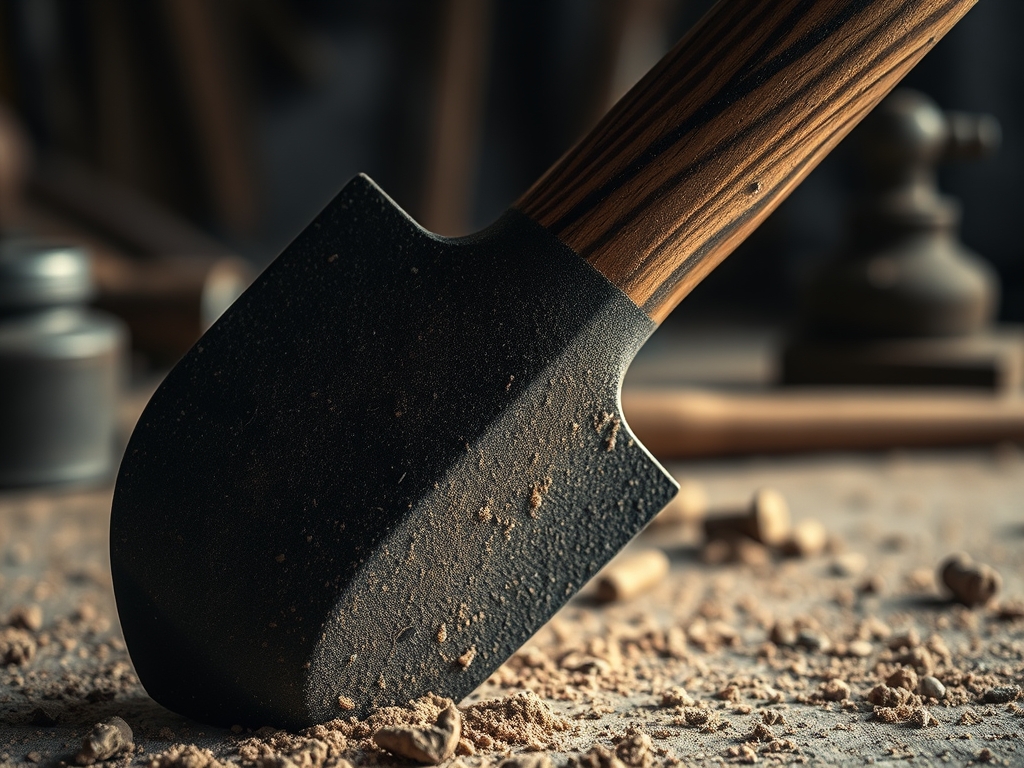
5. The Final Burnish and Finish
Once the shape is perfect, heat the entire piece to a dull red and scrub it vigorously with a steel brush. As it cools to a black heat (around 400 degrees Fahrenheit), rub a block of beeswax or linseed oil over the surface. The heat pulls the oil into the microscopic pores of the steel.
Mastery Tip: This is a chemical passivation process. The oil reacts with the heat to create a polymerised layer that seals the iron away from oxygen, preventing the oxidation-reduction reaction we know as rust.
THE TECHNICAL LEDGER
Maintenance & Longevity: To keep your shovel in peak condition, never leave it sitting in damp ash, as ash becomes acidic when wet and will eat through the finish. Re-apply a light coat of vegetable oil or wax once a season to maintain the moisture barrier.
Material Variations: For a Sustainable approach, source your steel from old construction rebar. For a Premium finish, use stainless steel, though be warned: stainless has a much lower thermal conductivity and is significantly harder to move under the hammer.
The Correction:
- The Crack: If a crack appears at a bend, you worked it too cold. Fix: Grind out the crack entirely with an oscillating tool and weld the gap, or start over.
- The Warp: If the blade is twisted, it was cooled unevenly. Fix: Re-heat to a dull cherry red and clamp it between two flat heavy plates until cool.
- The Thin Edge: If the front of the shovel is paper-thin, you over-hammered. Fix: Use a jeweler's saw to trim back to where the metal is at least 1/16 inch thick.
Studio Organization: Store your finished shovel in a dry, vertical rack. Avoid stacking heavy items on the blade, as constant pressure can lead to creep, a slow deformation of the metal over years of storage.
THE FINAL REVEAL
Look at that silhouette! There is something incredibly satisfying about seeing the transition from a round, organic handle into a crisp, geometric blade. The blackened finish gives it an ancient, soulful vibe that no store-bought tool can match. When you hold it, the balance should feel centered right at the shoulder transition, making it feel like an extension of your own arm. You have successfully manipulated fire and force to create a tool that is as beautiful as it is indestructible. Your fireplace just got a major upgrade!
STUDIO QUESTIONS
What is the best steel for a fire shovel?
Mild steel (A36) is ideal because it is easy to forge and has a high melting point. It provides excellent ductility during the shaping process and is affordable for beginners.
How do I prevent the shovel from rusting?
Apply a beeswax finish while the metal is still warm (around 400F). This creates a durable, non-toxic polymer layer that seals the steel from moisture and acidic wood ash.
Can I forge this without a professional anvil?
Yes, a large sledgehammer head secured in a bucket of sand or a thick section of railroad track can serve as a functional improvised anvil for small projects.
Why did my shovel blade warp during cooling?
Warping occurs due to uneven thermal contraction. If one side of the metal cools faster than the other, it pulls the blade. Always allow the piece to air-cool in a draft-free area.
What hammer weight is best for this project?
A 2-pound cross-peen hammer is the industry standard. It provides enough mass to move the steel efficiently without causing excessive user fatigue during the drawing-out phase.

