
Grab your safety glasses and clear the workbench because we are about to turn a block of timber into a masterpiece. There is nothing quite like the tactile resistance of a fresh piece of basswood meeting a razor-sharp edge. When you are Carving a Wooden Whale, you are not just making a decoration; you are performing a mechanical interrogation of the wood grain. Can you feel that? The way the fibers compress before the steel shears them away is pure physics in action. We are looking for that perfect "shaving" sound, a crisp whisper that tells us our bevel angle is spot on. This project is the ultimate diagnostic for your new gouges. It forces you to navigate complex curves and varying grain directions, testing the tensile strength of the wood and the ergonomic efficiency of your grip. We are going to dive deep into the anatomy of the cut, ensuring every stroke is intentional. By the time we finish, you will understand the relationship between tool geometry and wood density better than any textbook could ever explain.
THE STUDIO KIT
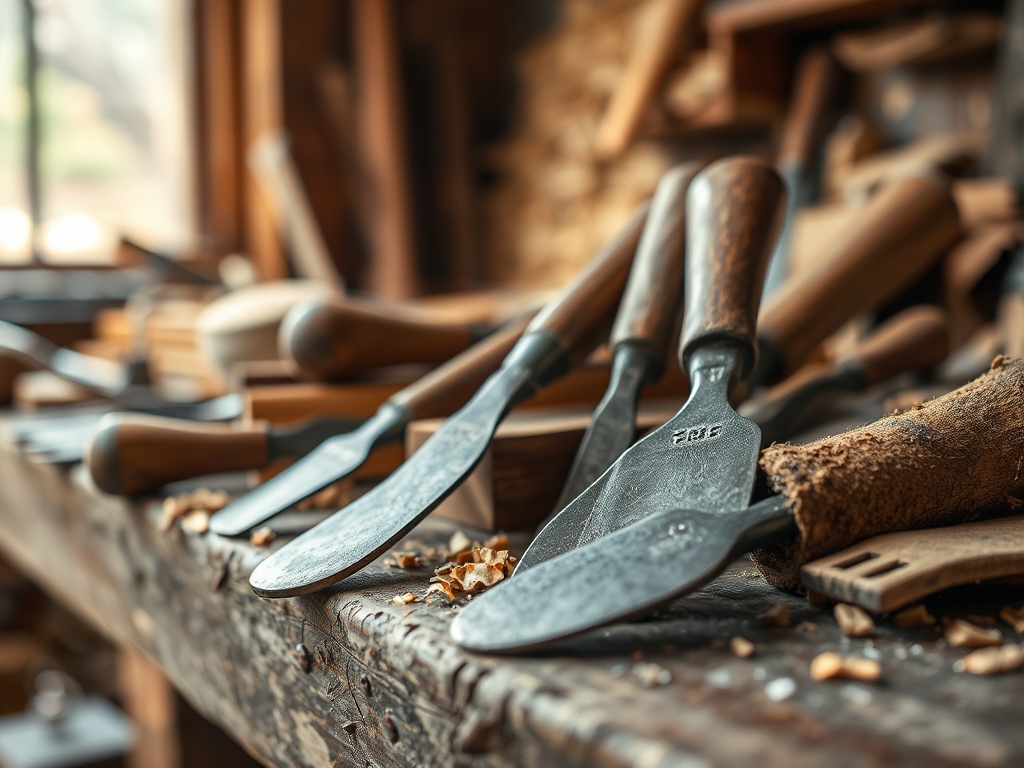
To master this aquatic silhouette, you need a kit that respects the cellular structure of your medium. Start with a high-quality basswood blank, measuring roughly two by four by eight inches. Basswood is the gold standard for testing new tools because its low lignin density and tight, uniform grain allow for clean cuts in any direction without excessive splintering. You will need a #7 sweep gouge for the bulk removal and a V-parting tool for defining the fins. Keep your calipers nearby to ensure the symmetry of the dorsal ridge; precision is the difference between a folk-art fluke and a biological wonder.
For the finishing touches, a detail knife with a high-carbon steel blade is non-negotiable. You should also have a strop impregnated with chromium oxide to maintain a polished edge throughout the process. If you cannot find basswood, Material Substitutions include butternut or white pine. Butternut offers a beautiful toasted-sugar color but has a coarser texture, while pine requires much sharper tools to avoid crushing the earlywood between the harder latewood growth rings. Always check your wood for moisture content using a digital meter; ideally, you want it between eight and twelve percent to prevent checking or warping after the piece is finished.
THE TEMPO
Carving is a marathon of focus, not a sprint. Expect to spend approximately four to six hours on this project, depending on your familiarity with your new gouges. The Maker's Rhythm is divided into three distinct phases: the Rough-In, the Refinement, and the Detail Polish. The Rough-In takes about ninety minutes. This is the high-energy stage where you use heavy mallet strikes or deep gouge pushes to remove the "waste" wood. You are fighting the bulk modulus of the material here, so take frequent breaks to avoid hand fatigue.
The Refinement phase is the longest, clocking in at roughly three hours. This is where the whale's anatomy emerges from the block. You will slow down, shortening your strokes and focusing on the tangential grain alignment. Finally, the Detail Polish takes about an hour. This involves burnishing the surface and cleaning up any "fuzz" left in the tight corners of the fluke. Do not rush this. The speed of the tool should decrease as the complexity of the surface increases; this prevents the tool from "skating" across the fibers and causing an accidental gouge in your finished surface.
THE CORE METHOD
1. Mapping the Grain and Profile
Before the first cut, use a soft lead pencil to trace your whale profile onto the block. Pay close attention to the longitudinal axis of the wood. You want the tail to run parallel to the grain to maximize its structural integrity. If the grain runs perpendicular to the tail, the fluke will be incredibly brittle and prone to snapping off along the growth rings. Mastery Tip: Wood is a series of microscopic tubes (xylem). By aligning your thinnest features with these tubes, you utilize the wood's natural tensile strength to prevent breakage during the carving process.
2. The Initial Excavation
Using your largest sweep gouge, begin removing the corners of the block to create a rounded "blank." Work from the center of the whale's back down toward the tail and head. This is called "carving with the grain." If the wood starts to tear or look "fuzzy," you are carving against the grain and pulling the fibers upward. Mastery Tip: This phase tests the shear strength of the wood. If your gouge requires excessive force, check your sharpening angle; a 20-degree bevel is usually ideal for softwoods to minimize resistance.
3. Defining the Flukes and Fins
Switch to your V-parting tool to outline the pectoral fins and the split in the tail. This tool acts like two knives joined at an angle, creating a mechanical wedge that severs fibers on both sides simultaneously. Be careful at the "crotch" of the tail where grain directions often meet and clash. Mastery Tip: Use a technique called "stop-cutting." Carve a vertical line first to sever the fibers, then carve toward that line. This prevents the tool from traveling too far and splitting the wood beyond your intended mark.
4. Refining the Surface Geometry
Now, use your smaller gouges to smooth out the faceted surface left by the roughing tools. Aim for long, continuous paring cuts. You are looking to achieve a burnished finish straight from the blade. If you see white streaks, your tool has a microscopic nick that is "plowing" rather than cutting. Mastery Tip: This stage relies on capillary action. A truly sharp blade severs the cell walls cleanly, leaving them open to take in oil finishes evenly. A dull blade crushes the cells, which will cause blotchy spots when you apply your final sealant.
THE TECHNICAL LEDGER
Maintaining your tools is just as important as the carving itself. After every session, wipe your gouges with a light coat of camellia oil to prevent oxidation. High-carbon steel is highly corrosive when exposed to the humidity of a standard workshop. For Material Variations, consider using reclaimed cedar for a weather-resistant outdoor version, or premium cherry if you want a challenging, high-density wood that holds incredible detail but requires frequent honing.
The Correction: Common Mistakes
- The Snap: If the tail breaks, do not use standard school glue. Use a polyurethane adhesive or a high-strength PVA; clamp it for 24 hours to ensure the bond is stronger than the surrounding lignin.
- The Tear-Out: If you hit a knot and the wood chunks out, use a mixture of fine sawdust and wood glue to create a structural filler. Once dry, it can be carved back to the correct contour.
- The Dull Edge: If the tool "skips," stop immediately. A skipping tool is a dangerous tool. Re-establish the primary bevel on a medium stone before stropping.
For Studio Organization, store your whale in a climate-controlled environment. Drastic shifts in humidity cause the wood to reach its fiber saturation point, leading to expansion and contraction that can crack your hard work. Keep your gouges in a tool roll made of canvas or leather to protect the delicate tips from impact damage.
THE FINAL REVEAL
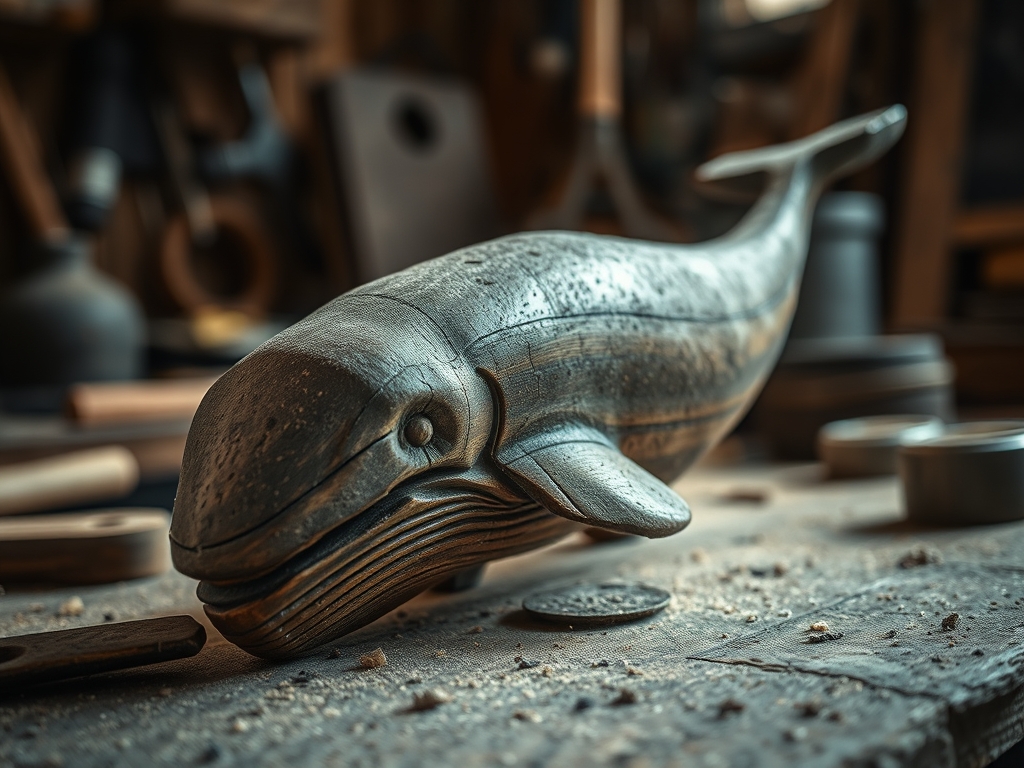
Look at that! You have successfully navigated the "rivers" of the wood grain to create a stunning, fluid form. Your whale should feel heavy and smooth in the hand, a testament to the density and moisture balance of the wood you chose. Notice how the light catches the facets of the tail; those crisp lines are the signature of a well-honed gouge. You have moved beyond just "whittling" and into the realm of applied physics and artistic engineering. This whale is a badge of honor, proving you can handle the nuances of wood anatomy. Now, give it a final rub with some beeswax to highlight that gorgeous grain, and get ready for your next challenge!
STUDIO QUESTIONS
Why is basswood preferred for testing new gouges?
Basswood has a very uniform cellular structure and low resin content. This allows the carver to feel the tool's true cutting action without interference from knots, heavy grain lines, or varying densities found in other species.
What does it mean to "carve with the grain"?
Carving with the grain means moving the tool in the same direction that the wood fibers grow. This prevents intercellular cleavage, ensuring the wood fibers are sliced cleanly rather than being lifted and torn away from the surface.
How do I know if my gouge is sharp enough?
A sharp gouge should shave the hair on your arm or cut through an end-grain piece of softwood with minimal resistance. The resulting surface should appear shiny or burnished, indicating the fibers were severed rather than crushed.
Can I use sandpaper instead of a detail knife?
While sandpaper achieves smoothness, it rounds over crisp anatomical details and clogs the porous surface with dust. A detail knife maintains the structural "facets" of the piece, which often look more professional and catch light better.
How do I prevent the wood from cracking over time?
Ensure the wood is properly seasoned before carving. After finishing, apply a penetrating oil or wax to slow the rate of moisture exchange between the wood and the air, which stabilizes the internal tension of the piece.

