Imagine the smell of charcoal and the sharp, metallic tang of cold carbon steel hitting the air as you step into the garage. There is a specific kind of magic in the resistance of a raw metal rod before it meets the heat. When you are Forging Decorative Steel Nails, you are not just making fasteners; you are manipulating the molecular structure of iron to create something that feels grounded and eternal. Your hands will feel the vibration of the hammer blow through the tongs, a tactile feedback loop that tells you exactly how the metal is moving. It is gritty, it is loud, and it is the most satisfying way to spend an afternoon. We are going to take raw stock and turn it into faceted, square-shanked masterpieces that will make your rustic door look like it was pulled straight from a seventeenth-century manor. This is not about perfection; it is about the honest geometry of hand-wrought work.
THE STUDIO KIT
To master the art of the square nail, you need a kit that respects the tensile strength of your medium. We are working with 1/4 inch or 3/16 inch mild steel round or square stock. Round stock is traditional, but square stock gives you a head start on that faceted look. You will need a propane or coal forge capable of reaching a bright orange heat, roughly 1800 to 2000 degrees Fahrenheit. Your primary tool is a cross-peen hammer, preferably between 1.5 and 2 pounds for better ergonomic control during rapid strikes.
The secret weapon here is the nail header, a specialized tool with a tapered square hole that allows the shank to drop through while the head stays above for shaping. You also need a sturdy anvil with a clean hardy hole to seat your tools. For precision, keep a pair of calipers nearby to check your shank thickness; consistency is the difference between a door that stays together and one that wobbles. If you cannot find mild steel, a "Material Substitution" would be recycled rebar, though its higher carbon content makes it more prone to cracking if you work it while it is too cold. Always keep a wire brush handy to burnish away the scale that forms during the heating process.
THE TEMPO
Forging is all about the "Maker's Rhythm." You have a limited window of time, usually about thirty to forty-five seconds, where the metal is plastic enough to move under the hammer. This is the thermal window. A single nail takes about five to seven minutes of active "hammer time," but you must account for the recovery time of the forge.
The rhythm goes like this: Heat for two minutes, forge the point for thirty seconds, reheat for one minute, draw out the shank for forty-five seconds, and finally, the "glory strike" where you form the head in the header. If you try to rush the cooling cycle, you risk creating internal stress fractures. Expect to spend the first hour just getting into the flow. By the second hour, your muscle memory will take over, and you will be producing a nail every five minutes with mechanical precision.
THE CORE METHOD
1. Tapering the Point
The first step is to create a four-sided taper on the end of your rod. Hold the steel at a slight angle against the anvil and strike with a consistent downward force. Rotate the piece exactly ninety degrees after every two strikes. This ensures the structural integrity of the point so it can pierce heavy oak without bending.
Mastery Tip: This process relies on displacement. You are not removing metal; you are pushing it forward. Keep the metal at a bright cherry red to ensure the grains flow smoothly rather than shearing.
2. Drawing Out the Shank
Once the point is set, you need to define the length of the nail. Use the edge of the anvil to create a "shoulder" where the head will eventually sit. This involves striking the metal while hanging it slightly off the edge of the anvil face. The goal is to maintain a consistent gauge throughout the length of the shank.
Mastery Tip: The physics of plastic deformation means the metal will get longer as it gets thinner. Use light, rapid taps to smooth out any hammer marks and ensure the shank remains perfectly square.
3. The Cut-Off
Heat the area just above your shoulder and use a hardy cut or a chisel to nick the metal all the way around. Do not cut it completely off yet; you want it to stay attached by a thin thread of steel so you can transport it to the nail header without losing your heat.
Mastery Tip: Precision here prevents stress risers. A clean, even nick ensures that when you finally snap the nail off into the header, the break is clean and centered.
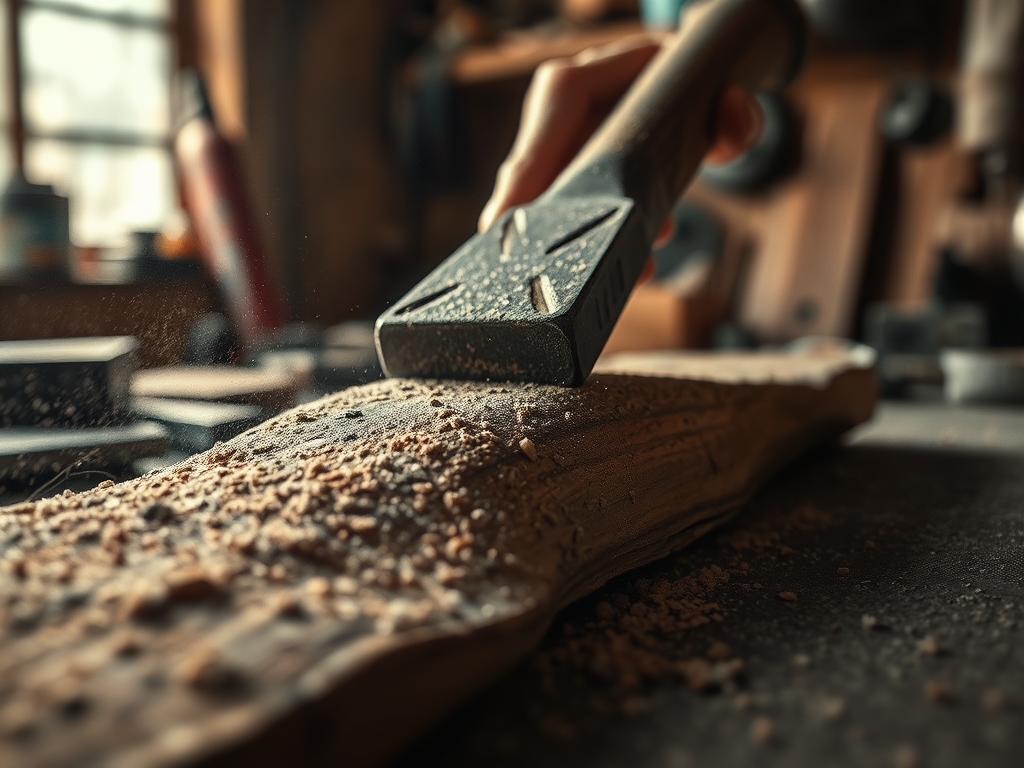
4. Heading the Nail
Drop the hot shank into the nail header. The shoulder you created will catch on the rim. Give the protruding metal three or four heavy, centered blows to mushroom it out. Then, use the peen of your hammer to create the decorative facets.
Mastery Tip: This stage utilizes upsetting, where the diameter of the metal increases as the height decreases. If you strike off-center, the head will be lopsided, ruining the symmetry of the piece.
THE TECHNICAL LEDGER
Maintenance & Longevity: Steel is porous at a microscopic level when hot. To prevent rust, finish your nails by dipping them in linseed oil while they are still black-hot (around 400 degrees). This creates a polymerized coating that bonds to the surface, providing a beautiful, dark patina that resists oxidation.
Material Variations: For a premium look, you can use silicon bronze rod. It has a lower melting point but offers incredible corrosion resistance and a stunning gold hue. If you are going sustainable, old horseshoe nails or salvaged wrought iron fence pickets provide a "grain" to the metal that looks spectacular when etched.
The Correction:
- The Fish-Tail: If the point splits, you worked the metal while it was too cold. Trim the end and start the taper again at a higher heat.
- The Bent Shank: If the nail bends while heading, your hole in the header is too large. Ensure the clearance is no more than 1/32 of an inch.
- Cold Shuts: These are small cracks caused by folding metal over itself. Avoid this by never striking a "fin" of metal back into the body; file it off instead.
Studio Organization: Store your finished nails in a wooden box lined with oil-soaked rag. Avoid plastic bins, which can trap moisture and trigger flash-rusting. Group them by length and head style so you can easily grab the right fastener for the specific thickness of your door planks.
THE FINAL REVEAL
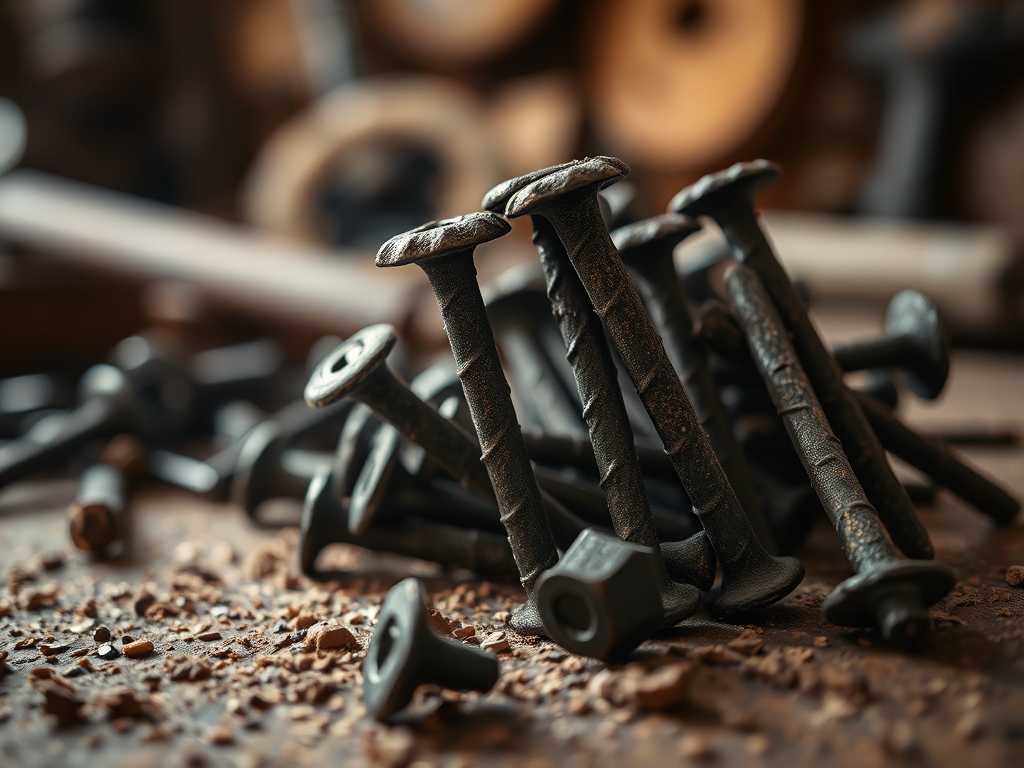
Look at that! You have just turned industrial scrap into a set of bespoke hardware that hums with history. When you drive these square nails into your rustic door, the flat sides will bite into the wood fibers, creating a mechanical bond that a round, modern nail could never achieve. The way the light catches those hand-hammered facets adds a layer of "visual weight" to your project. It feels heavy, it feels intentional, and it feels like something that will still be standing a hundred years from now. You did not just build a door; you forged its soul.
STUDIO QUESTIONS
What is the best steel for decorative nails?
Mild steel (A36) is the industry standard because it is ductile and easy to shape. It provides excellent tensile strength without being too brittle, making it perfect for beginners and pros alike.
Why use a square shank instead of round?
Square shanks provide superior grip by compressing wood fibers rather than splitting them. This increases the frictional resistance within the timber, ensuring your rustic door remains structurally sound for decades.
Do I need to quench the nails in water?
No, quenching mild steel in water can make it unnecessarily brittle. It is better to let them air cool or quench them in oil to provide a protective, rust-resistant patina finish.
How do I prevent the nail heads from snapping off?
Ensure you have a smooth transition between the shank and the head. Avoid sharp "necks" by using a properly tapered nail header, which distributes the mechanical stress more evenly across the joint.