
My welding bench is a battlefield of frozen constellations; every stray spark and cooling globule of spatter creates a jagged topography that ruins my precision setups. You know that feeling when you slide a fresh sheet of cold rolled steel across the table and it catches on a microscopic bump? It is physically painful. I realized I needed a solution that was tougher than the mess it was meant to clear. Forging a Metal Scraper became the only logical project for my Sunday afternoon. I wanted something with a heavy hand feel and a razor edge that could survive the high heat of a workshop environment. We are talking about high carbon steel meeting an anvil to create a tool that feels like an extension of your own arm. The tactile feedback of a well weighted scraper is unmatched. It is not just about cleaning; it is about the structural integrity of your workspace. Let us dive into the heat and the hammer swings required to reclaim our flat surfaces.
THE STUDIO KIT
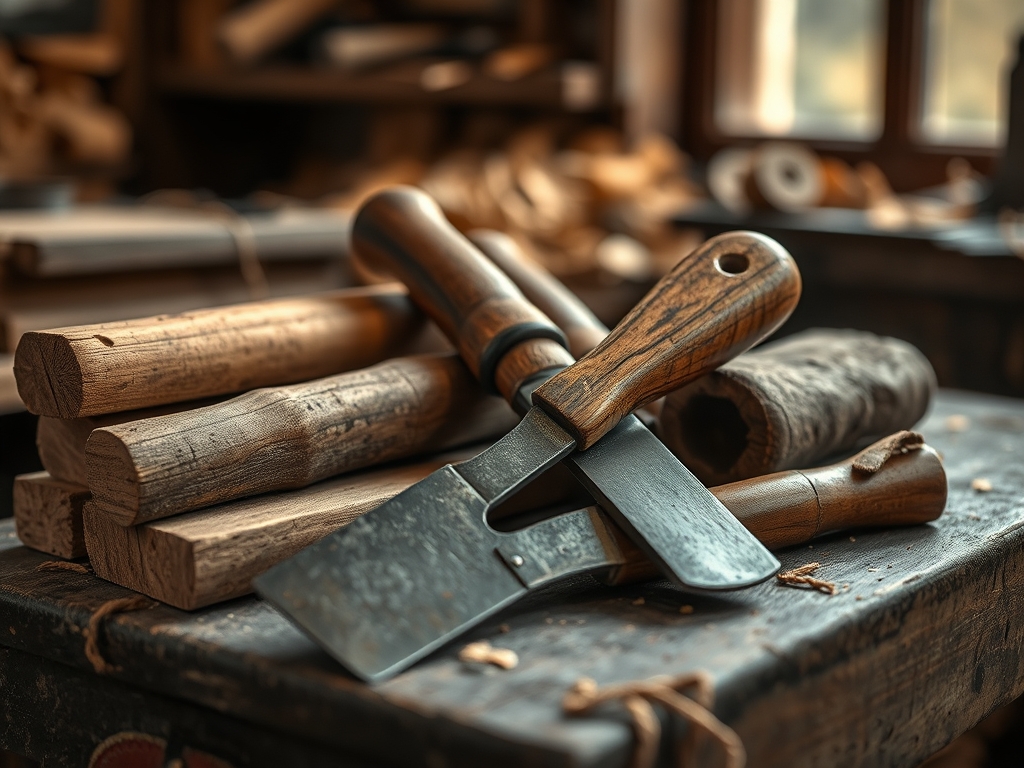
To begin this build, you need a material with a high carbon content to ensure the edge can be hardened and tempered. I am using a piece of reclaimed leaf spring, which is typically 5160 grade steel. This alloy contains chromium, which increases hardenability and provides excellent toughness. You will also need a propane or coal forge, an anvil with a clean face, and a 2.5 pound cross peen hammer. For the refining stages, keep your calipers nearby to check the thickness of the blade taper and an oscillating tool with a sanding attachment for cleaning up the profile.
Material Substitutions: If you cannot source a leaf spring, an old high carbon file works beautifully. Just be aware that files are extremely brittle before tempering. For the handle, while a simple steel integral handle is standard, you could use a porous hardwood like hickory or ash if you prefer a traditional grip. If you go the wood route, you will need a jeweler's saw to cut precise slots for the tang and a burnish tool to smooth the transition between metal and wood.
THE TEMPO
The "Maker's Rhythm" for this project is dictated by the thermal cycles of the steel. You cannot rush the molecular realignment of the grain. Expect to spend about 45 minutes on the initial upsetting and drawing out of the steel. This is the high energy phase where you are working at a bright orange heat. Following the forge work, the annealing process requires a slow cool down over 4 to 6 hours; usually, I leave it in a bucket of vermiculite overnight. The final grinding, hardening, and tempering will take another 2 hours of focused, methodical work. It is a dance between the violent force of the hammer and the surgical precision of the grinder.
THE CORE METHOD
1. Drawing Out the Taper
Start by heating the first three inches of your steel stock to a bright cherry red. Using your cross peen hammer, strike the metal at a slight angle to draw the material forward and outward. This increases the surface area while reducing the gauge of the edge. You are aiming for a wedge shape that transitions from a thick spine to a thin, aggressive tip.
Mastery Tip: Always maintain a consistent heat. If you strike the steel while it is too cold (dull red or black), you risk creating internal stress fractures. The tensile strength of the steel is compromised when the grain is forced to move without sufficient thermal energy to allow for plastic deformation.
2. Squaring the Shoulders
Once the blade is flared to your desired width, use the edge of the anvil to set the shoulders. This creates a clear transition between the working edge and the handle. Use your calipers to ensure the blade is centered on the stock. This step is crucial for the ergonomic balance of the tool; a lopsided scraper will cause hand fatigue during long cleaning sessions.
Mastery Tip: This is known as "setting down" the material. By concentrating your blows on the edge of the anvil, you are creating a mechanical stop. This increases the structural integrity of the tool by aligning the grain flow through the transition point rather than cutting across it.
3. Normalizing the Grain
After the shape is finalized, heat the scraper to non magnetic temperature and let it air cool. Repeat this three times. This process, called normalizing, relieves the internal stresses caused by the hammer blows and shrinks the grain size of the steel. Smaller grains result in a tougher, more durable edge that will not chip when hitting hardened weld spatter.
Mastery Tip: Watch the "shadows" in the steel as it cools. This is the recrystallization phase. By normalizing, you are ensuring that the subsequent hardening process is uniform, preventing the blade from warping or cracking in the oil quench.
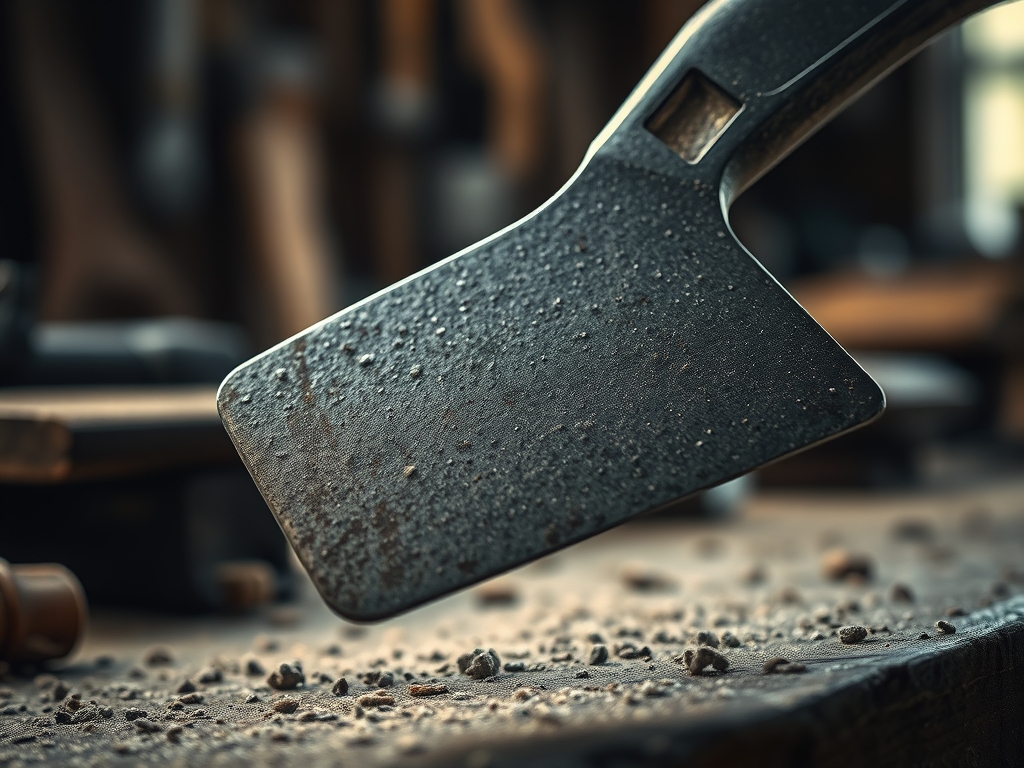
4. Hardening and Tempering
Heat the leading inch of the scraper until it is no longer magnetic, then plunge it vertically into a tank of agitated oil. This "freezes" the carbon in a crystalline structure called martensite. The steel is now glass brittle. Immediately place it in an oven at 400 degrees Fahrenheit for two hours to "temper" it, which trades a bit of hardness for necessary toughness.
Mastery Tip: The vertical plunge is vital to prevent warping. If you enter the oil at an angle, one side of the blade cools faster than the other, causing the metal to pull and bow. This is a lesson in thermal conductivity and fluid dynamics.
THE TECHNICAL LEDGER
Maintenance & Longevity
To keep your scraper in peak condition, never use it as a pry bar. The hardened edge is designed for shear forces, not lateral leverage. Every few weeks, give the edge a light pass with a diamond hone to maintain the bevel. Apply a thin coat of paste wax to the body to prevent oxidation in humid shop environments.
Material Variations
- Sustainable: Reclaimed railroad spikes (high carbon versions marked HC) offer a great source of "found" material.
- Premium: S7 shock resisting tool steel is the gold standard for scrapers, though it requires a more complex heat treat cycle.
- Recycled: Old lawnmower blades are often made of 1084 steel, which is incredibly easy to heat treat at home.
The Correction: Three Common Mistakes
- The "Blue" Edge: If you see blue colors while grinding the finished tool, you have ruined the temper. The friction heat has softened the steel. Fix: Cool the metal in water every two passes on the grinder.
- Fish-Mouth Splits: This happens when you hammer the edges of the steel without managing the center. Fix: Always hammer the flat sides more than the edges to keep the material compressed.
- Warped Blade: Occurs during an uneven quench. Fix: You can attempt to "quench press" the blade between two thick aluminum plates to pull the heat out evenly while keeping it flat.
Studio Organization
Store your scraper on a magnetic tool strip or in a dedicated leather sheath. Never toss it into a drawer with other metal tools. The hardened edge will chip if it impacts other high carbon steels, and keeping it isolated prevents the burnished finish from being scratched.
THE FINAL REVEAL
There is a profound satisfaction in holding a tool you forged with your own hands. This scraper is heavy, purposeful, and incredibly sharp. When you slide it across your welding bench, it does not just move the debris; it shears it off with a crisp, metallic "ping" that tells you the surface is truly flat. The dark, fire scaled finish on the handle contrasts beautifully with the polished, silver edge of the blade. It is a piece of functional art that turns a mundane chore into a moment of craftsmanship. Your bench will thank you, and your future welds will be cleaner because of it.
STUDIO QUESTIONS
What is the best steel for a scraper?
High carbon steels like 5160 or 1095 are ideal. They allow for a martensitic transformation during quenching, which provides the hardness necessary to scrape away hardened steel spatter without dulling the edge immediately.
Why did my scraper crack during the quench?
Cracking usually results from quenching at too high a temperature or using water instead of oil. The rapid thermal contraction creates internal stresses that exceed the steel's tensile strength, causing a catastrophic failure.
Can I forge this without an anvil?
You can use a heavy piece of railroad track or a large sledgehammer head secured in a vise. The key is mass; you need a surface that will not absorb the energy of your hammer blows.
How do I know if the temper is right?
Look for a light straw color on the polished steel after heating. This indicates a temperature of roughly 400 to 450 degrees Fahrenheit, which provides the perfect balance of ductility and edge retention for a hand tool.

