
Grab your strongest shears because we are about to dive into the visceral world of heavy duty textile engineering. There is a specific, satisfying resistance when you push a needle through eighteen ounce duck cloth; it is a tactile conversation between your hands and the structural integrity of the weave. If you want a garment that survives sparks, grease, and sharp edges, you must master the art of Hand Stitching Heavy Canvas. This is not about delicate embroidery. This is about managing high tensile strength and ensuring your seams do not buckle under the weight of a heavy wrench or a set of calipers. We are building a piece of wearable armor that feels stiff at first but eventually molds to your body like a second skin. The scent of waxed cotton and the gritty texture of the fibers are your first clues that this project is going to be legendary. We are going to treat these fibers with the respect they deserve while forcing them into a shape that serves your workflow perfectly.
THE STUDIO KIT
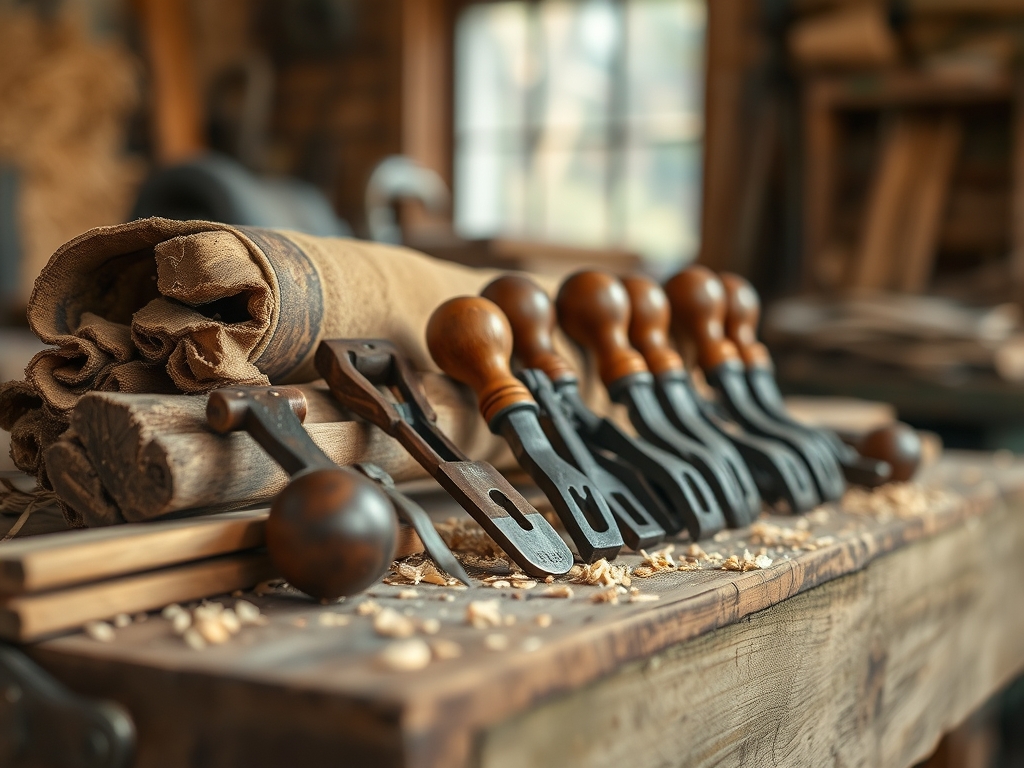
To build an apron that defies physics, you need tools that can handle the ply count of industrial grade materials. Start with a 15 to 20 ounce cotton duck canvas or a heavy waxed sailcloth. These materials are highly porous, which allows them to take on water resistance treatments, but their dense weave requires a harness needle with a blunt tip and a large eye. You will also need bonded nylon thread (size T90 or T135) because cotton thread will simply snap under the friction of the canvas.
Your arsenal must include a stitching awl to pre-punch holes; trying to force a needle through four layers of canvas without a pilot hole is a recipe for broken tools and sore fingers. Grab a bone folder to crisp your hems and a rotary cutter for clean, fray-free edges. For the hardware, use solid brass rivets and a setting tool to reinforce stress points like the tops of the pockets. If you cannot find heavy canvas, a high density denim or even recycled moving blankets can serve as a Material Substitution, though you will lose some of the puncture resistance inherent in the duck weave.
THE TEMPO
Creating a shop apron is a marathon, not a sprint. You should allocate approximately twelve to fifteen hours for this build. The "Maker's Rhythm" is a psychological state where the repetitive motion of the awl and the thread becomes meditative. The first three hours are dedicated to the layout and calibration phase; measuring twice and marking your grain lines with tailor's chalk.
The next six hours are the structural assembly, where the bulk of your hand stitching occurs. This is the most labor intensive part because you are maintaining consistent tension across long seams. Finally, the last three to four hours involve hardware integration and finishing touches like burnishing the edges of any leather straps. Do not rush the stitching. If your rhythm breaks, your stitch length will vary, which compromises the load bearing capacity of the seam.
THE CORE METHOD
1. Mapping the Grain
Before you make a single cut, identify the warp and weft of your canvas. Align your main body panels with the vertical grain to ensure the apron does not stretch out of shape when you load your pockets with heavy metal tools. Use a steel square to ensure every corner is a perfect ninety degrees.
Mastery Tip: Understanding grain direction is vital because the vertical warp threads are usually under higher tension during the weaving process. By aligning the apron vertically, you utilize the material's natural resistance to gravity.
2. Pre-Punching the Path
Because we are working with such a high gauge of fabric, you cannot stitch "on the fly." Use a stitching pony to hold your fabric and a wing divider to mark a straight line exactly 1/4 inch from the edge. Use your awl to punch holes at consistent intervals, usually five stitches per inch.
Mastery Tip: Pre-punching prevents internal friction from heating up and weakening the synthetic fibers of your thread. It also ensures that the holes are perfectly aligned across multiple layers of fabric.
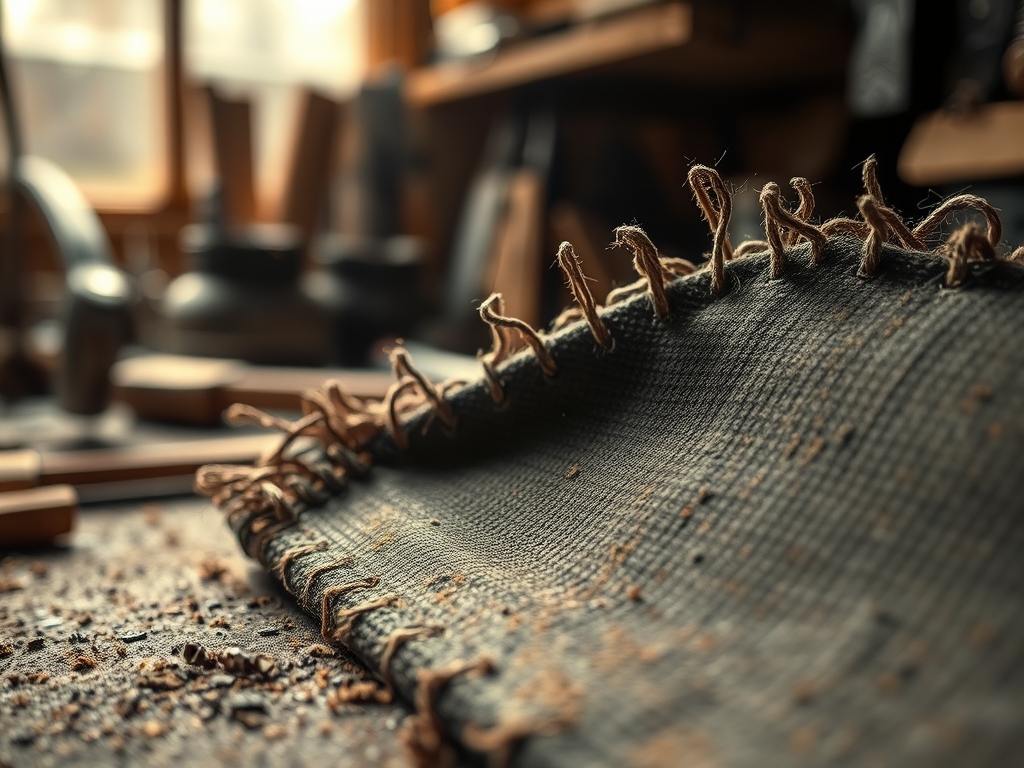
3. The Saddle Stitch Execution
The saddle stitch is the gold standard for durability. Use two needles on a single length of thread, passing them through the same hole from opposite directions. This creates a locking mechanism that will not unravel even if one thread is eventually cut by a sharp tool in your shop.
Mastery Tip: This technique relies on friction-fit mechanics. As the threads cross inside the hole, they compress against each other, creating a seal that prevents moisture from wicking into the center of the seam.
4. Reinforcing the Stress Points
The corners of your pockets are the first places to fail. After stitching, install a copper or brass rivet at the top of each pocket. Use a hammer and a rivet setter to compress the burr onto the post until it is flush with the fabric.
Mastery Tip: Rivets distribute shear stress across a larger surface area than a single thread could ever manage. This prevents the fabric from tearing at the point of highest mechanical advantage.
THE TECHNICAL LEDGER
Maintenance is what separates a tool from a rag. Never put your heavy canvas apron in a washing machine; the agitation will destroy the structural integrity of the fibers and strip away any wax coatings. Instead, use a stiff brush to remove dry debris and a damp cloth for spills. If the canvas starts to feel "thirsty," reapplying a blend of beeswax and paraffin will restore its water-repellent properties.
Material Variations
For a sustainable approach, look for hemp canvas, which has a higher tensile strength than cotton and requires fewer pesticides to grow. If you want a premium finish, integrate vegetable tanned leather for the neck strap and waist ties; it will develop a patina over time that tells the story of your work.
The Correction: 3 Common Mistakes
- The Bunching Seam: If your canvas is puckering, your thread tension is too high. Back off the pull and ensure the fabric stays flat between stitches.
- The Frayed Edge: If the edges of your canvas are shedding, you didn't cut clean enough. Use a rotary cutter and then "sear" the edge with a bit of beeswax to lock the fibers.
- The Broken Needle: This happens when you try to bridge a "hump" of fabric. Use a jean-a-ma-jig or a scrap piece of canvas to level the presser foot or your hand-stitching angle.
Studio Organization
Store your apron by hanging it on a wide, padded hanger in a cool, dry place. Folding heavy canvas can lead to permanent creasing and fiber fatigue along the fold lines, which eventually becomes a failure point. Keep it away from direct sunlight when not in use to prevent UV degradation of the nylon thread.
THE FINAL REVEAL
Stand back and look at that silhouette! Your finished shop apron should feel substantial, almost like a piece of soft luggage you wear. The contrast of the heavy thread against the rugged canvas creates a professional aesthetic that screams authority. This isn't just a garment; it is a custom engineered solution to the chaos of the studio. As you wear it, the canvas will soften at the joints while remaining rigid where you need protection. You have successfully navigated the physics of textiles to create something that will likely outlast most of the power tools in your kit.
STUDIO QUESTIONS
What is the best thread for hand stitching canvas?
Bonded nylon or polyester thread in size T90 is ideal. These synthetic fibers offer high tensile strength and resistance to chemicals, ensuring the seams do not rot or snap when exposed to harsh shop environments or heavy tool loads.
How do I prevent my hands from cramping?
Use a stitching pony to hold the material, allowing you to use both hands for the needles. This improves ergonomic alignment and reduces the grip strength required to manage the heavy canvas, preventing repetitive strain during long sessions.
Can I use a regular sewing machine for this?
Most domestic machines lack the torque to penetrate multiple layers of 18oz canvas. Unless you have an industrial walking-foot machine, hand stitching with an awl is the only way to ensure deep, consistent penetration without damaging your equipment.
Why is my waxed canvas turning white at the folds?
This is known as "crazing." It occurs when the wax is displaced within the fibers. It is a natural characteristic of the material and does not affect structural integrity; you can remove it by applying light heat with a hair dryer.

