
Grab that lonely block of cherry wood sitting in your scrap bin; it is about to become the most important part of your morning routine. There is a specific, grounding vibration that travels through your palm when steel meets seasoned hardwood. You can feel the resistance of the cellulose fibers and the way the lignin holds everything together. We are not just making kitchenware today. We are Carving a Coffee Scoop that balances perfect volume with structural integrity. When you hold a scrap of wood, you are holding a compressed history of seasons. The density of the rings tells you exactly how much torque the neck of your spoon can handle before it snaps. We want a tactile experience that feels heavy enough to be premium but light enough to dance in your hand. This project is the ultimate marriage of fluid dynamics and organic geometry. We are going to transform a rough, porous rectangle into a polished vessel that measures exactly two tablespoons of dark roast bliss every single time.
THE STUDIO KIT

To master this build, you need tools that respect the tensile strength of your timber. Start with a high-carbon steel hook knife; the radius of the blade determines the internal curvature of your bowl. You will also need a straight sloyd knife for the exterior shaping and a pair of digital calipers to ensure your wall thickness remains consistent. For the layout, grab a marking awl and a compass to scribe your perfect circle.
If you do not have cherry or walnut, look for "Material Substitutions" like silver maple or birch. Avoid softwoods like pine; the resin content is too high and the fiber density is too low to hold a crisp edge. You need a wood with a tight grain structure that can be burnished to a high sheen without splintering. For the finishing touch, keep some 120 to 400 grit sandpaper and a food-safe drying oil, like tung oil or linseed oil, nearby to seal the pores against moisture.
THE TEMPO
The Maker's Rhythm is all about syncing your breath with the resistance of the wood. This is not a race; it is a three-phase mechanical evolution.
- The Mapping (20 Minutes): This is the cerebral phase where you calculate the volume and grain direction. You are looking for the "long grain" to run down the handle for maximum strength.
- The Excavation (1 Hour): This is the high-energy phase. You are removing bulk material and finding the hollow. Your heart rate will climb as the chips fly.
- The Refinement (1.5 Hours): The longest phase. This involves thinning the walls, smoothing the transitions, and sanding. It requires patience and a light touch to avoid "chatter marks" from your tools.
THE CORE METHOD
1. Scribing the Volume
Use your compass to draw a circle on the face of the wood. Use your calipers to measure the depth of your scrap; you need at least one inch of thickness to create a deep enough well for the beans. Mark the center point with an awl to prevent your drill bit or gouge from wandering.
Mastery Tip: The science of structural integrity dictates that you must leave at least three millimeters of wall thickness at the base. If you go thinner, the wood may warp or crack during the drying cycle as it loses internal equilibrium.
2. Hollow the Vessel
Starting from the center, use your hook knife to scoop out the interior. Work across the grain rather than with it to prevent the blade from diving too deep and splitting the block. You are creating a concave hemisphere that utilizes capillary action to hold onto the oils of the coffee beans later.
Mastery Tip: Always carve toward the center of the bowl from the edges. This supports the wood fibers against each other, preventing "tear-out" which occurs when the blade exits the grain at a steep angle.
3. Shaping the Profile
Once the bowl is hollowed, flip the piece over and begin removing the exterior bulk. Use long, sweeping strokes with your sloyd knife to create a fluid transition from the round bowl to the flat handle. This is where you establish the ergonomic grip.
Mastery Tip: Observe the grain direction. If the wood feels "hairy" after a cut, you are carving against the grain. Flip the piece 180 degrees to slice the fibers cleanly, ensuring a smooth surface that requires less sanding.
4. The Thinning Process
Use your thumb as a gauge to feel the thickness of the walls. You want a uniform density all the way around. This ensures that when the wood expands and contracts with humidity, it does so evenly, preventing the "stress fractures" common in poorly balanced carvings.
Mastery Tip: Thin walls allow the wood to be slightly flexible. This flexibility absorbs the kinetic energy of a drop, making your scoop surprisingly durable despite its delicate appearance.
5. Burnishing and Sealing
Sand the scoop through the grits until it feels like silk. Finally, use a smooth stone or the back of a metal spoon to burnish the surface. This compresses the surface fibers, closing the pores and creating a natural luster. Apply your oil and watch the grain "pop."
Mastery Tip: Burnishing creates a mechanical seal. By flattening the microscopic "fuzz" of the wood, you reduce the surface area available for bacteria to hide, making your scoop more hygienic for daily use.
THE TECHNICAL LEDGER
Maintenance & Longevity: Never soak your scoop in water. The porous nature of wood means it will absorb liquid, causing the fibers to swell and eventually crack the lignin bonds. Wipe it with a damp cloth and re-oil every three months to maintain the moisture barrier.
Material Variations:
- Sustainable: Reclaimed orchard wood (apple or pear) offers incredible density and beautiful figure.
- Premium: Roasted bird's eye maple provides a "toasted" aesthetic that matches the coffee theme perfectly.
- Recycled: Old tool handles made of ash are incredibly tough and have a pre-aged stability.
The Correction:
- The Crack: If a small check appears, fill it with a mixture of wood dust and food-safe cyanoacrylate glue. Sand flush immediately.
- The Flat Spot: If you carve too deep on one side, adjust the overall symmetry of the bowl rather than trying to fix one spot; a slightly smaller, symmetrical scoop looks intentional.
- The Rough Grain: If the wood keeps tearing, your tool is dull. Hone your blade on a leather strop with polishing compound to regain a razor edge.
Studio Organization: Store your unfinished carvings in a paper bag with their own chips. This slows down the evaporation of internal moisture, preventing "drought stress" which leads to warping before you can finish the project.
THE FINAL REVEAL
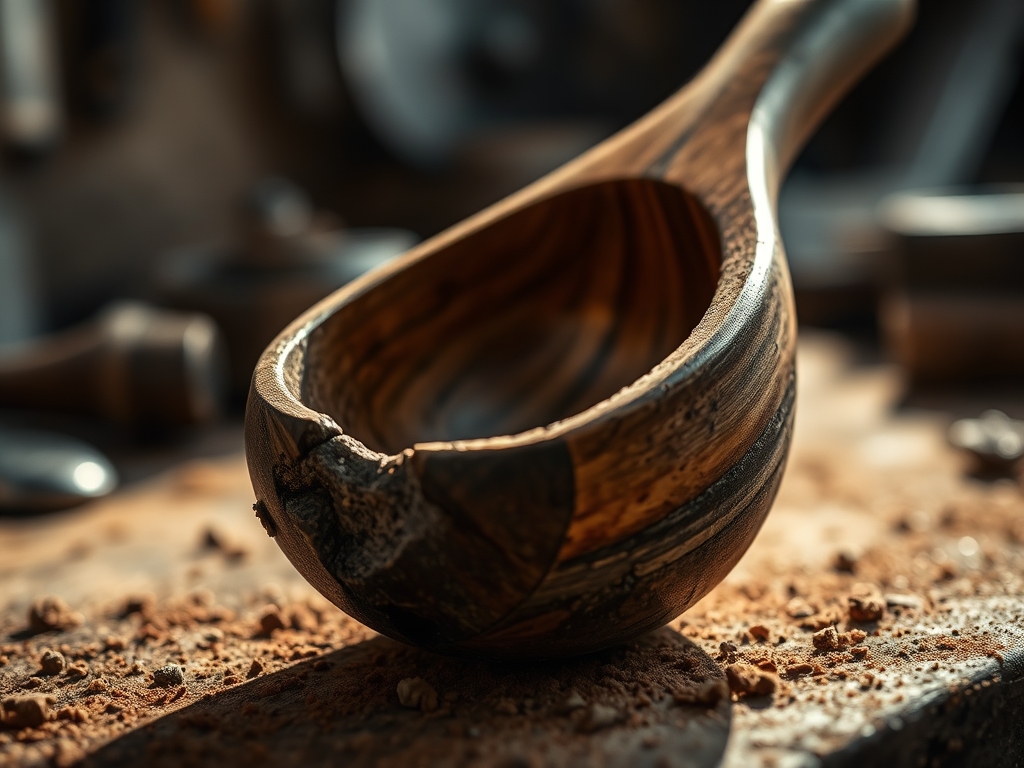
Look at that silhouette! You have successfully turned a discarded fragment of the forest into a high-performance kitchen tool. The way the light catches the burnished curves of the cherry wood is pure magic. It feels balanced in the hand; the weight is centered in the bowl, while the handle provides the perfect lever for digging into a fresh bag of beans. This scoop is not just a measure; it is a testament to your ability to read the physics of a living material. You have mastered the grain, respected the fibers, and created something that will likely outlast your favorite coffee mug.
STUDIO QUESTIONS
What is the best wood for carving a scoop?
Hardwoods like cherry, walnut, or maple are best. They have a high fiber density and tight grain, which allows for smooth carving and long-term durability in a kitchen environment. Avoid softwoods like pine which can splinter and impart resin flavors.
How do I measure the volume of the scoop?
Before finishing the exterior, fill the hollowed bowl with water or salt and pour it into a standard measuring spoon. If it is too small, carve deeper. If it is too large, you can sand the top rim down to reduce capacity.
Why does my wood keep splitting during carving?
Splitting usually happens because you are carving into the "end grain" or the wood is drying too quickly. Ensure your tools are razor-sharp to slice fibers rather than prying them apart, and keep the wood away from direct heat sources.
Is mineral oil safe for a coffee scoop?
Yes, food-grade mineral oil is excellent. It is non-toxic, does not go rancid, and penetrates deep into the porous structure of the wood to provide a moisture-resistant barrier. Reapply whenever the wood starts to look dull or feels dry.

