
Imagine the scent of raw, vegetable tanned hide hitting you the second you walk into the studio. It is earthy, rich, and thick with the promise of a project that will outlive your favorite cast iron skillet. We are talking about the ultimate upgrade for your culinary steel. Hand Stitching a Knife Roll is not just a weekend craft; it is an exercise in structural engineering and tactile luxury. When you run your thumb along the grain of a heavy cowhide, you are feeling a network of collagen fibers that provide incredible tensile strength. This material does not just hold tools; it protects the delicate, microscopic edge of a chef's knife from oxidation and mechanical impact. We are going to take that raw, porous surface and transform it into a professional grade vault for your blades. Grab your coffee and clear your workbench. We are diving into the grit and the glory of heavy leatherwork.
THE STUDIO KIT
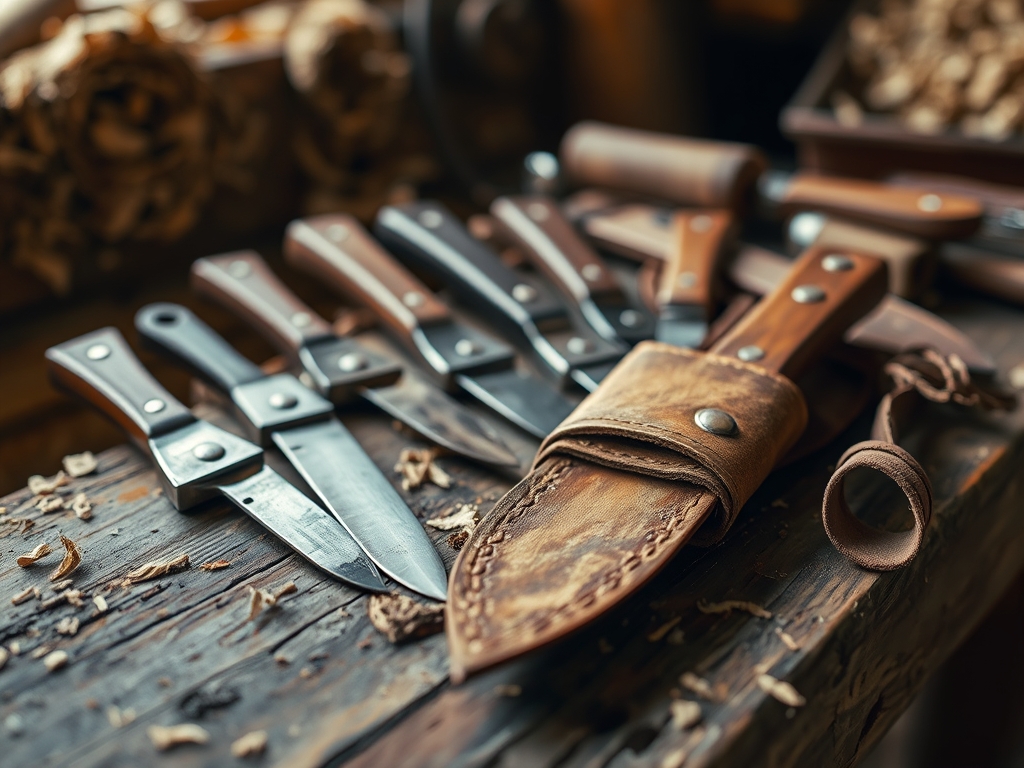
To build a piece that withstands the high friction of kitchen life, you need a kit that respects the physics of the material. We are starting with 5 to 6 ounce vegetable tanned leather. This weight provides the perfect balance between flexibility for rolling and thickness for puncture resistance. You will need a rotary cutter with a fresh tungsten carbide blade to ensure clean, perpendicular edges. For the joinery, skip the sewing machine. We are using 0.8mm waxed polyester thread and two blunt tipped harness needles. The wax reduces friction as the thread passes through the leather, preventing heat buildup that could weaken the fibers.
Your precision tools are non negotiable. A wing divider is essential for scribing consistent stitch lines exactly 4mm from the edge. For the holes, a diamond point awl or a set of stitching chisels will create the necessary apertures without tearing the grain. If you cannot find heavy cowhide, a high density synthetic microfiber or a heavy duty waxed canvas can serve as material substitutions, though they lack the self healing properties of natural leather. Do not forget a bone folder for creasing the pockets and a poly mallet to drive your punches without mushrooming the steel heads of your tools.
THE TEMPO
The "Maker's Rhythm" is a real psychological state where your heart rate syncs with the strike of the mallet. Expect this project to take approximately twelve to fifteen hours of active bench time. The first phase is the Layout and Geometry, which takes about two hours. This is where you calculate the displacement needed for the knife handles. The Cutting and Edging phase requires ninety minutes of intense focus; one slip of the knife means starting over.
The bulk of your time, roughly eight hours, is dedicated to the actual stitching. Hand stitching follows a rhythmic cadence: pierce, pull, cross, and tighten. Finally, the Finishing and Burnishing takes two hours. This is the most rewarding part, where you use friction to seal the edges. Understanding this timeline prevents "maker fatigue," ensuring that your last stitch is just as tight and precise as your first.
THE CORE METHOD
1. Patterning for Volume
We start by laying out our knives on the hide to determine the "pocket pitch." You cannot just lay them flat; you must account for the circumference of the handles. Use your calipers to measure the thickest part of each handle and add a 15 percent buffer for the leather's natural take up.
Mastery Tip: This involves the science of material displacement. Leather has limited elasticity, so if you stitch the pockets too tight, the tension will cause the leather to "cup" or warp, ruining the flat profile of the roll.
2. Scribing the Stitch Path
Using your wing dividers, scribe a light groove along the perimeter where the pockets meet the base. This groove serves two purposes: it guides your chisel and it "seats" the thread so it sits flush with the surface, protecting it from abrasive wear.
Mastery Tip: Scribing creates a path of least resistance for the needles. By seating the thread below the surface, you are utilizing mechanical shielding, ensuring the thread is not the first thing to rub against a kitchen counter.
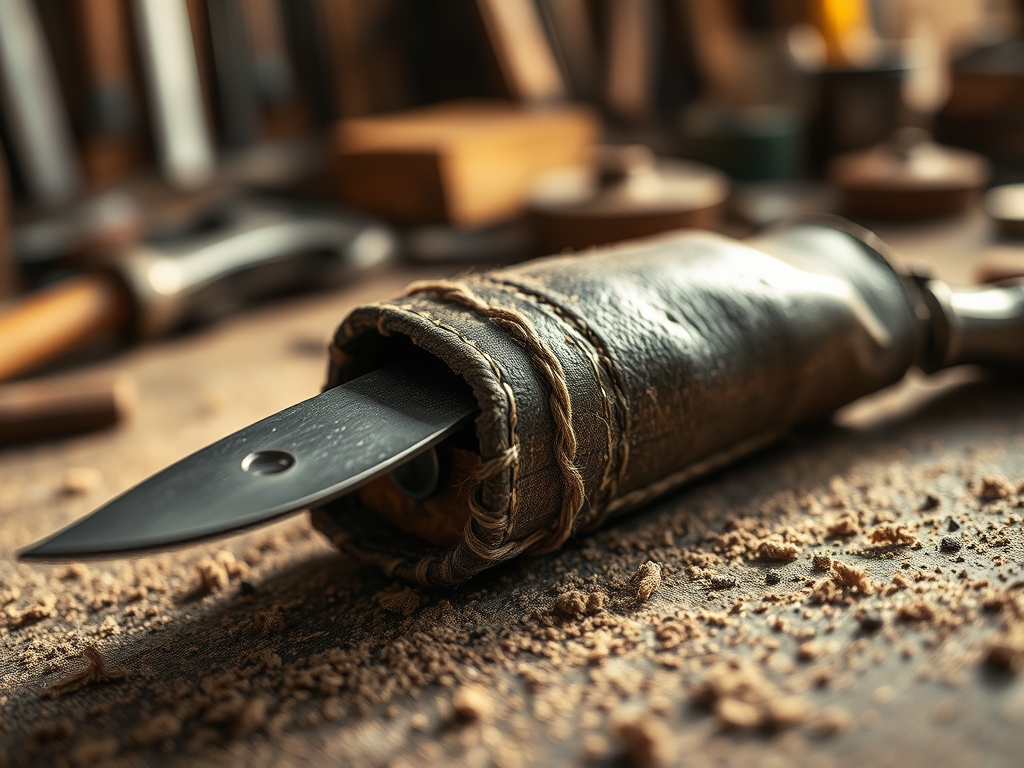
3. The Saddle Stitch
This is the gold standard of leatherwork. Unlike a machine lockstitch, a saddle stitch uses two needles on a single thread that pass each other in every hole. If one thread breaks, the other remains locked in place, preventing the entire seam from unraveling.
Mastery Tip: Maintain consistent tension vectors. If you pull harder on the left needle than the right, the stitch line will look staggered. Consistent tension ensures the internal friction of the wax holds the seam together indefinitely.
4. Edge Burnishing
Once stitched, the edges will look raw and "hairy." We apply a small amount of water or tragacanth gum and rub the edge vigorously with a wooden burnisher. The heat generated by the friction fuses the protein fibers together.
Mastery Tip: This is a process of lignification and compression. You are essentially cauterizing the edge of the leather to create a hydrophobic barrier, preventing moisture from seeping into the grain and causing rot.
THE TECHNICAL LEDGER
Maintenance and Longevity
To keep your knife roll in peak condition, apply a light coat of neatsfoot oil or beeswax conditioner every six months. This keeps the fibers lubricated, preventing the "cracking" that occurs when the natural oils evaporate. Avoid silicone based sprays, as they clog the pores and prevent the leather from breathing.
Material Variations
For a sustainable twist, look into cork leather or "reclaimed" upholstery hides. While thinner, these can be reinforced with a stiffener like Salpa (bonded leather fiber) to provide the necessary structure for heavy blades. For a premium finish, use English Bridle leather, which is pre-saturated with waxes and tallows for extreme weather resistance.
The Correction: Common Pitfalls
- The Slanted Stitch: If your stitches look straight on the front but wonky on the back, your awl angle is inconsistent. The Fix: Use a stitching pony to hold the work vertically so your arm stays at a perfect 90 degree angle.
- Pocket Blowouts: If the bottom of the pocket rips, you stitched too close to the edge. The Fix: Reinforce the start and end of every seam with a "backstitch" and a tiny drop of cyanoacrylate glue on the knot.
- Leather Stretching: If the roll becomes floppy, you cut the pieces "across the grain." The Fix: Always cut long structural pieces parallel to the animal's spine for maximum dimensional stability.
Studio Organization
Store your leather flat in a cool, dry place. Never store a project in progress in direct sunlight; UV rays break down the tannins and can cause "sun tanning," which permanently changes the color and flexibility of the hide. Keep your needles in a magnetized tray to prevent losing them in the scrap pile.
THE FINAL REVEAL
There is nothing quite like the "thud" of a heavy leather roll hitting a wooden prep station. Your knives are now encased in a custom fit armor that reflects your dedication to the craft. The hand stitching adds a rugged, artisanal aesthetic that no factory machine can replicate. As you use the roll, the leather will develop a patina, a darkening and smoothing of the surface that tells the story of every meal you have prepared. It is functional art at its finest; a marriage of high end physics and old world soul.
STUDIO QUESTIONS
What is the best thread for a knife roll?
Use 0.8mm or 1.0mm waxed polyester. Polyester has high tensile strength and will not rot when exposed to kitchen moisture, unlike cotton or linen. The wax coating helps the thread lock into the leather fibers during the stitching process.
How do I prevent my knives from rusting inside leather?
Vegetable tanned leather is generally safe, but you must ensure the blades are bone dry before storage. For long term storage, apply a food safe mineral oil to the steel. Avoid chrome tanned leather, as residual salts can cause pitting corrosion.
Can I use a regular sewing machine?
Most domestic machines cannot handle 5oz leather; you risk timing issues or a broken motor. Hand stitching is superior for a knife roll because the saddle stitch is structurally more secure and allows for thicker, more durable thread.
How do I clean a leather knife roll?
Wipe it with a damp cloth and mild saddle soap if it gets greasy. Never submerge it in water. If it gets wet, let it air dry away from heat sources to prevent the leather from becoming brittle and shrinking.
What size needles should I use?
Use Size 2 or 004 harness needles. These have blunt tips designed to follow the holes made by your awl. Sharp needles will pierce the thread or the leather grain in the wrong place, weakening the structural integrity of your seam.

